Command Camera Offline FAQs

Using the settings in your Customer Control Portal or the Control app, you can set up notifications if your camera loses connection to your home Internet network. You can set up notifications in just a few steps:

  1. Log into your Portal or App
  2. Select Notifications from the menu on the left in the portal, or tap the hamburger menu at the top left in the app.
  3. Select System Actions to Watch.  These are actions listed as Urgent information, Important information and Other. Check the box next to the action you’d like to watch.
  4. Select One of my Video Cameras isn’t responding to get an alert if a camera is offline.
  5. Select how you would like to be notified – text, email, and/or SMS message

Your cameras are connected to your system via your home Internet. Here are a few reasons why you may lose connection:

It lost power.
Check the power supply to ensure it’s plugged in. Once power is restored, your cameras will reconnect to the Internet and you should resume full video.

It lost connection to your Internet.

  • Check to ensure your home Internet is powered and functioning correctly. Follow the prompts from the troubleshooting wizard when attempting to view LIVE VIDEO. This will help walk you through troubleshooting steps.

  • If you remember your old username (SSID) and password, it needs to be updated to your router and modem and the cameras will reconnect. To reconnect follow these simple steps:
    1. Reset the changed SSID/password or setup the new router with the same SSID/password that’s currently saved inside your camera. When the SSID/password matches, the camera will reconnect, and you should resume full control.
    2. If you want to make changes to your SSID/password, you can do so on the Control portal.

Your Wi-Fi Connectivity is weak.
You may need to move the camera closer to the router or check the camera’s signal strength

To maintain uninterrupted video service, we recommend making changes to the SSID/password information on your cameras before making changes to the router or modem. To make the changes, follow these steps:

  1. Log into your Control Portal (You can’t make these changes in the Control app).
  2. Select Video from the menu on the left side of the screen.
  3. Select Settings from the main menu in the blue bar at the top of the Video page.
  4. Select Wireless Network from the listed setting options.
    1. On this page, you’ll see the Video Device; make sure this is the camera you would like to be updated, and that the camera’s SSID is the current SSID.
  5. Select “Manual” to make changes if your new network hasn’t been set up yet. Or select “Scan” if you’d like to change to an existing network.
  6. If selecting “Manual
    1. Update the Wireless Network Name (SSID) with the changes you want for your new SSID or Network.
    2. Set your encryption type to match the new settings or changes. (Most home networks with a password use WPA2)
    3. Select the Algorithm to match the encryption type
    4. Create the new password
    5. Select Advanced
    6. Select Apply to apply these settings to all wireless cameras on this account
    7. Select Continue to apply the new wireless settings.     


If you need help changing your SSID/Password, contact our customer support team by calling 1-800-ADT-ASAP.

The first step in troubleshooting your offline cameras is to check your Wi-Fi settings. To do this, first, log into your Control web portal.

From there, you will need to check the signal strength

  1. Go to the Video tab
  2. Select Settings
  3. Using the Video Device drop down menu, select the desired video device and then click Video Device Info
  4. Select the refresh symbol next to Wireless Signal Strength to display the video device’s Wi-Fi signal strength

If the signal strength is 55% or below, we recommend the following tips:

  • Move your camera, router, and/or Wi-Fi extender to its original location
  • Move the router, camera, and/or Wi-Fi extender closer together

In the event the above does not resolve your offline camera issues, then re-check your signal strength, and continue to move your camera, router, and/or Wi-Fi extender until the signal strength is 55% or greater.

Sometimes Wi-Fi interference such as a wall, or television set impacts the connectivity to your cameras. In this case, a Wi-Fi extender may be needed. 

Sometimes a solution to fix your offline Command camera is by deleting it and re-adding it back in through the web portal. Please note that any automations (Rules, Schedules, and Scenes) tied to the camera will be permanently deleted from your site. However, video clips will still be available.

To delete a camera:

  1. Go to the Video tab
  2. Select Settings
  3. Using the Video Device drop down menu, select the desired video device and then click Video Device Info
  4. Once in the Video Device Information Page, note the MAC address of the camera you want to delete and re-add
  5. On the bottom left corner, select Delete this Video Device

To add a camera:

  1. Connect the camera’s power cord into an outlet
  2. Wait for the camera’s LED to turn a solid green or 1-2 minutes if your camera does not have an LED indicator, allowing it to boot up and connect
  3. Back in the Settings Page, select Add Video Device and press the Refresh Devices button on the top right
  4. Once refreshed, type or paste in the MAC address and press the Find button
  5. Enter a name for the camera and press Install

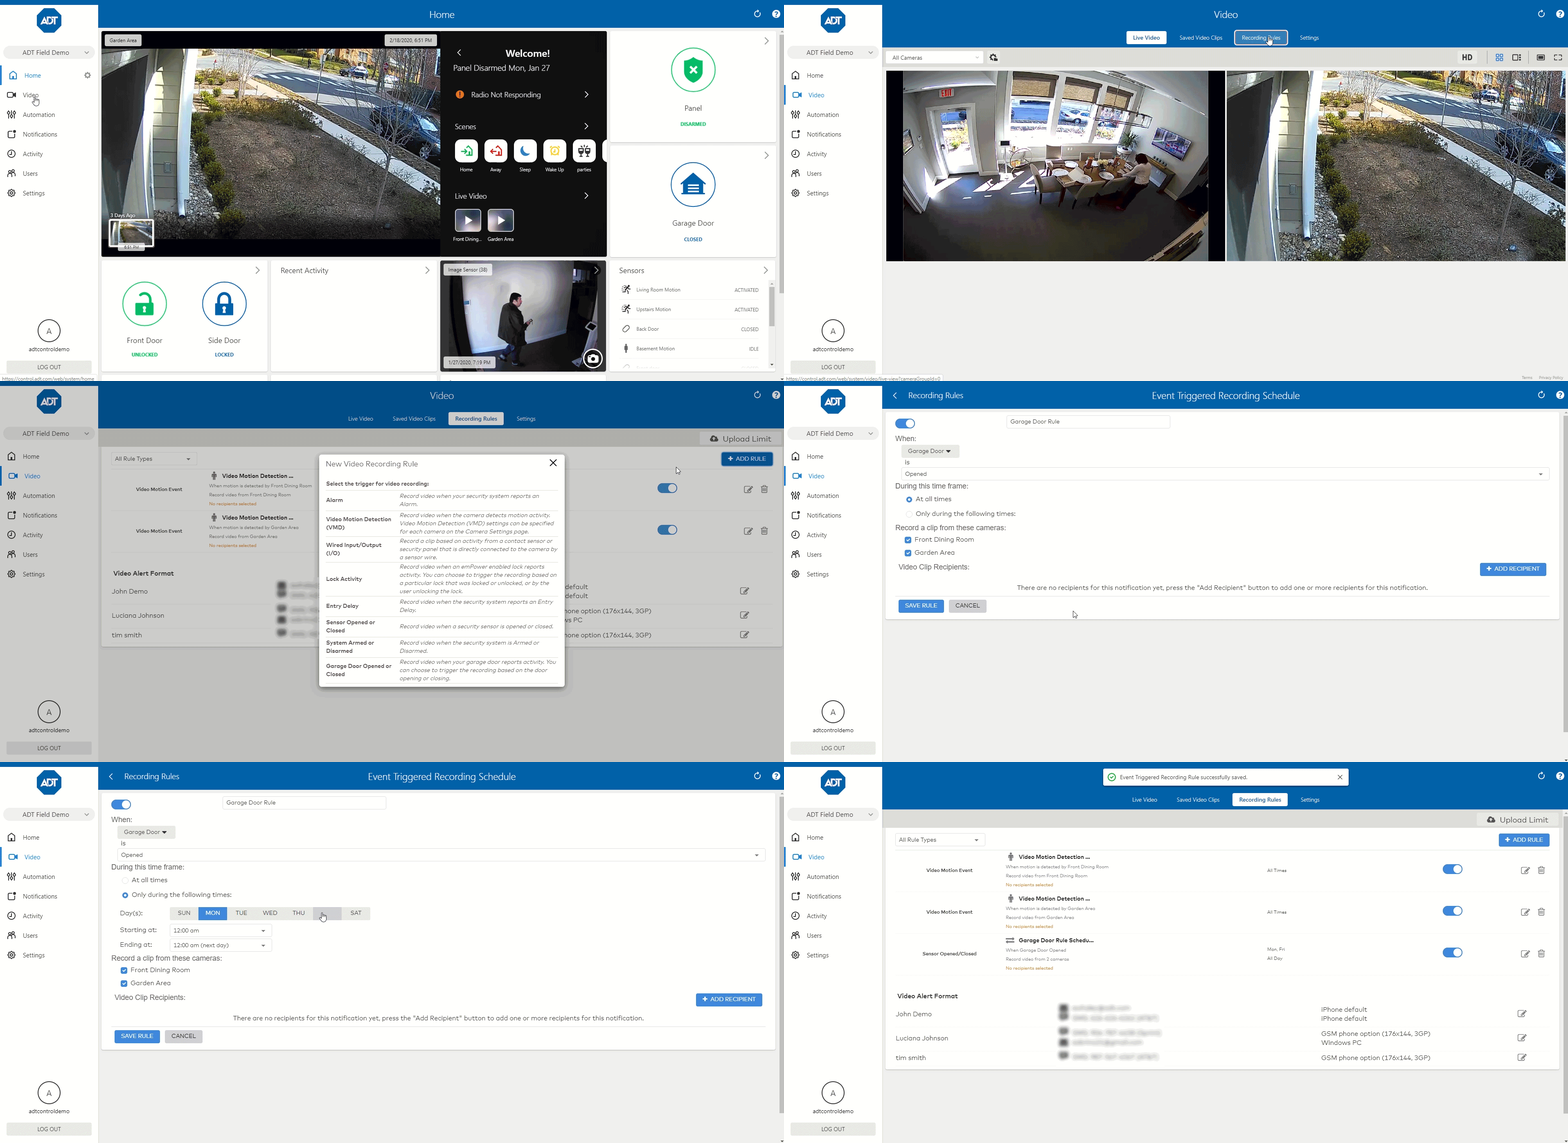
You can get more from your cameras by setting rules for how and when they capture video clips. There may be a specific scheduled event like a plumber coming to the house that you want to capture. Or maybe just anything that happens within a camera’s view. Either way, creating a rule is easy. From your Control dashboard:


  1. Click on Video in side menu.
  2. Click on Recording Rules in top nav.
  3. Click on +Add Rule.
  4. From the pop-up, select the rule you want to apply to the camera.
  5. Designate the days and times you want the rule to apply. It could be at all times, or on a specific day during a set period of time.
  6. When you’re done, click Save.

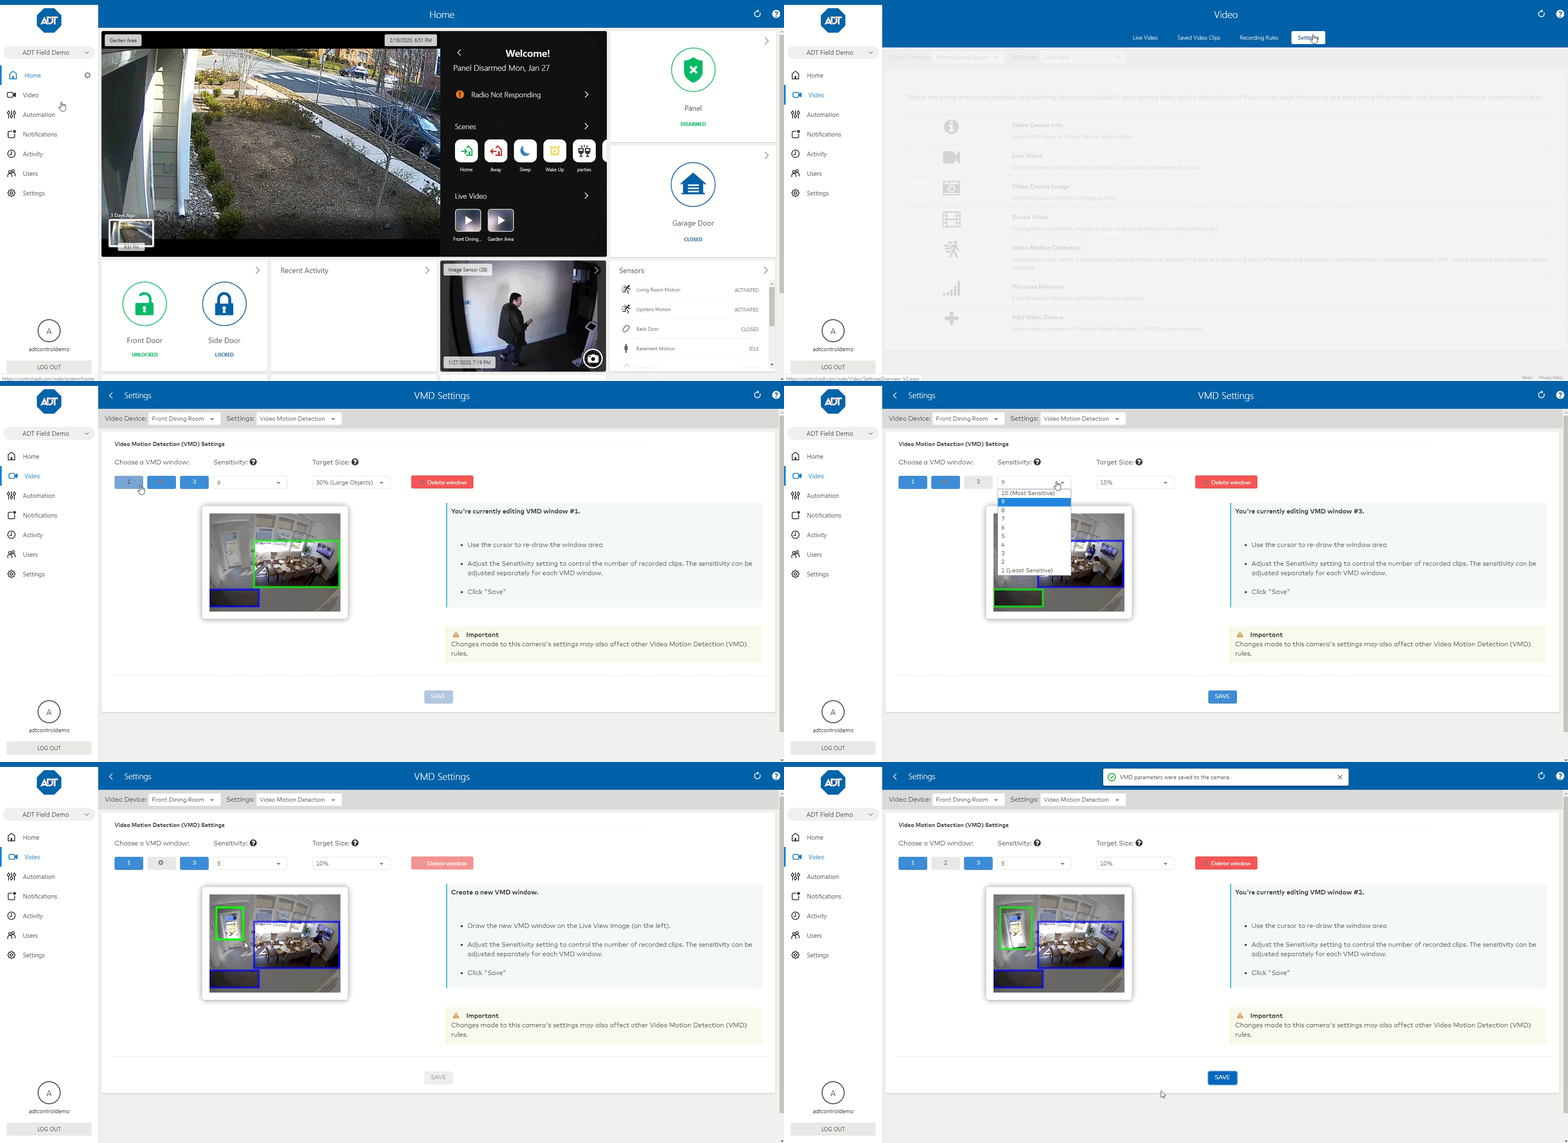
Your cameras each have the ability to provide different video motion detection zones for different areas of their field of view. You can also set the detection sensitivity for each zone separately to ensure it detects motion you want – such as a door opening – and not ones you don’t, like a curtain rustling. Here’s how to create and/or set parameters for Detection windows from your Control dashboard:


To add a new Video Motion Detection (VMD) window:

  1. Select the VMD window number by clicking on the + icon, then use the cursor to draw the box for the new zone.
  2. Use the dropdowns at top to adjust sensitivity and target size
  3. Click Save.


To adjust existing VMD windows:

  1. Click on Video on side menu.
  2. Click on Settings in top nav.
  3. Select the camera you want to adjust from the dropdown at top.
  4. Select a VMD window at top to adjust the sensitivity and target size.
  5. Use the dropdowns at top to adjust sensitivity and size; click Save when you’re done with each window.

The video encoder links your high-definition analog camera to the ADT Command digital system. It transforms the analog signal into digital, allowing you to stream video from your analog cameras to the Command platform or record video from your analog cameras with an SVR (sold separately) Video streaming resolution is up to 1080p.

The ADT Video Encoder is connected by a wire from your camera to the Video In port on the front. An Ethernet cable from the Video Encoder connects to an Ethernet port on your internet router. There could also be a Power over Ethernet (PoE) switch box in between the encoder and router if you have more than one encoder.

Your Video Encoder is powered in one of two ways: by an AC Adapter plugged into an outlet, or a PoE (Power over Ethernet) switch box. If a PoE switch is used, then your camera is powered by the switch box, and does not need an AC Adapter plug. The PoE switch box, if present, is powered by its own AC Adapter plugged into an outlet. It is connected to the encoder by an Ethernet cable, and then connected to your internet router by another Ethernet cable.

There are a few solutions you could try to verify if your ADT Video Encoder is causing your camera to go offline:

  1. First, check the Power LED on the front of the video recorder. If the light is not green, make sure that the encoder has power.
    • If your encoder has a power adapter, verify that it is plugged into a working outlet. Once power is restored, wait about 1-2 minutes for the encoder and camera to come back online.

  2. If your encoder is getting its power from the PoE switch box, make sure the switch box is plugged into a working outlet and the Ethernet cables are securely connected from the encoder to your POE switch box and from the PoE switch box to your internet router. Verify that the Power LED is green, and that your router has power. Next, check the Network LED. If it is not green, your encoder is not connected to the network. Make sure the Ethernet cable is securely connected from the encoder to your router. Verify that your internet is working. It may be necessary to restart your router. Once internet is restored, allow about 1-2 minutes for the encoder and camera to come back online.

  3. Finally, if your encoder is still offline, it likely needs a reset. Go into the Video > Settings > Video Device Info section within the Control portal and delete the encoder. Then reset the device by using a paper clip to press the Reset button on the front of the device for approximately 15 seconds, then release it. Once the LED lights stop flashing and become solid green, verify that the encoder and camera are back online. Once completed, go back to the Control portal and re-enroll the video encoder in the Video > Settings > Add Video Devices section. Deleting and adding a video encoder is the same as deleting and re-adding a camera. Refer to Command Camera Offline FAQs for instructions.

If camera or encoder are still offline, please call 1-800-ADT-ASAP for assistance