

Battery Replacement Instructions for Simon 3 and Simon XT Panels
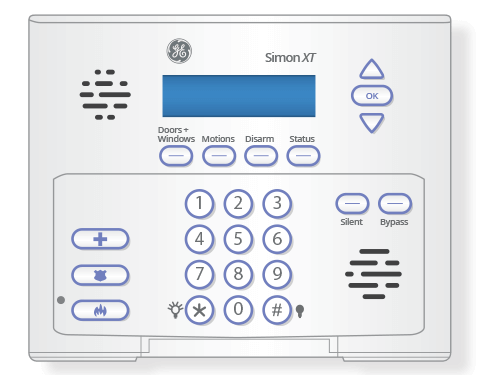


Simon XT
Instructions
What You'll Need
- A registered MyADT Account
- 1 small Phillips head screwdriver
- 6V 1.3Ah battery
- Small pliers with electrically insulated handles
- Electrical tape
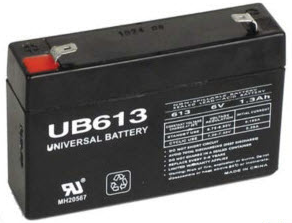
You can purchase a 6V 1.3Ah battery from MyADT or from retailers such as Walmart, Amazon, Batteries Plus, Home Depot, and Lowe’s. We also recommend checking with your local retailers for availability. Here are the specifications of the 6V 1.3Ah battery:
- Voltage: 6 V
- Capacity: 1.3 Ah
- Terminals: F1
- Chemistry: Sealed Lead Acid
- Length: 3.82”
- Width: 0.94”
- Height: 2.20”
- Weight: 0.66 lbs.
NOTE:
The Simon XT keypad backup battery is located inside the keypad. The Simon XT uses a 6V 1.3Ah battery.
Step 1:
Set your system to Test Mode. Log into your MyADT.com account, click on the Alarm System tab, and select System Test.
Step 2:
If present, remove the screw from the top of the keypad. Your keypad may not have a screw.
Step 3:
Depress the two tabs on top of the keypad and open the unit by carefully swinging the front panel down.
IMPORTANT:
Hold the front panel of keypad while opening to ensure it is resting on the hinge and not supported by the battery wire.
Step 4:
Quickly inspect the old battery. If the battery looks abnormal (i.e. has a swollen or split case, liquid leaking from the case, or corroded terminals) close the keypad and call (800) ADT-ASAP to schedule a service call.
Step 5:
Release the battery by pushing up on the top tab and pushing down on the bottom tab.
Step 6:
Gently pull the battery out of the compartment.
Step 7:
Gently pull the BLACK wire connector (-) from the black terminal. Then pull the RED wire connector (+) out the same way. Do not pull on the wires. You may need the pliers to loosen and remove the connectors.
Step 8:
Remove the old battery from battery compartment.
CAUTION:
You should apply a piece of electrical tape over each battery terminal to prevent any metal from touching the terminals.
Step 9:
Take the new battery out of its packaging. If necessary, remove the plastic terminal protectors if the battery has them.
Step 10:
The red wire has an inline fuse that makes the wire a little thicker than the black wire. Firmly push the RED wire connector onto the battery’s red terminal, and then do the same with the BLACK wire connector to the black terminal.
NOTE:
If the battery leads are not properly seated in the gap between the upper tab and the battery compartment wall as described above, the keypad will not properly close.
Step 11:
Press the top of the battery upward against the upper retaining tab, pushing the tab out of the way slightly, until there is enough room between the two tabs to insert the battery.
Step 12:
Slide the battery into the battery compartment, making sure that the crossed leads remain in the gap between the upper tab and the top of the battery compartment. Continue to push the battery until the two retaining tabs snap and latch the battery into place.
Step 13:
Replace the keypad cover. Ensure the two tabs snap into place and if applicable, replace the top screw.
Step 14:
Check your alarm keypad to ensure it no longer displays the “SYSTEM LOW BATTERY” message. If it still shows a low battery message, try pressing the System Status button and Disarm button. Repeat if necessary. If the message still shows, it may take 24 to 48-hours for the battery to fully charge. If after 48-hours the message still shows, please call (800) ADT-ASAP to troubleshoot your system.
When the message is gone or you’re waiting for the battery to charge, remove your system from Test Mode at MyADT.com.
Ensure your system is working properly by testing your system. Go to MyADT.com and place your system on test and then follow the directions in the user guide to test your system or visit MyADT.com to find your user guide.
Simon 3
Instructions
What You'll Need
- A registered MyADT Account
- 1 small Phillips head screwdriver
- 6V 1.3Ah battery
You can purchase a 6V 1.3Ah battery from MyADT or from retailers such as Walmart, Amazon, Batteries Plus, Home Depot, and Lowe’s. We also recommend checking with your local retailers for availability. Here are the specifications of the 6V 1.3Ah battery:
- Voltage: 6 V
- Capacity: 1.3 Ah
- Terminals: F1
- Chemistry: Sealed Lead Acid
- Length: 3.82”
- Width: 0.94”
- Height: 2.20”
- Weight: 0.66 lbs.
NOTE:
The Simon 3 keypad backup battery is located inside the keypad.
Step 1:
Set your system to Test Mode. Log into your MyADT.com account, click on the Alarm System tab, and select System Test.
Step 2:
Unplug the control panel’s transformer from the electrical outlet. You may need the screwdriver to remove the retaining screw on the transformer.
Step 3:
Locate the locking tab on the top of the keypad; press the tab down with your finger and gentle swing the keypad cover down. When the keypad-cover is open, the system will talk to you; this is normal.
IMPORTANT:
Hold the front panel of keypad while opening to ensure it is resting on the hinge and not supported by the battery wire.
Step 4:
Quickly inspect the old battery. If the battery looks abnormal (i.e. has a swollen or split case, liquid leaking from the case, or corroded terminals) close the touchscreen and call (800) ADT-ASAP to schedule a service call.
Step 5:
Remove the battery cover by unscrewing the two screws.
Step 6:
Gently pull the battery out of the compartment.
Step 7:
Gently pull the BLACK wire connector (-) from the black terminal. Then pull the RED wire connector (+) out the same way. Do not pull on the wires. You may need the pliers to loosen and remove the connectors.
Step 8:
Remove the old battery from battery compartment.
CAUTION:
You should apply a piece of electrical tape over each battery terminal to prevent any metal from touching the terminals.
Step 9:
The red wire has an inline fuse that makes the wire a little thicker than the black wire. Firmly push the RED wire connector onto the battery’s red terminal, and then do the same with the BLACK wire connector to the black terminal
Step 10:
Insert the new battery into the battery compartment and then reattach the battery compartment cover.
Step 11:
Press the top of the battery upward against the upper retaining tab, pushing the tab out of the way slightly, until there is enough room between the two tabs to insert the battery.
Step 12:
Replace the keypad; ensure the two tabs snap into place.
Step 13:
Plug the transformer into the outlet, and if necessary, screw it back into the wall outlet.
Step 14:
Check your alarm keypad to ensure it no longer displays the “SYSTEM LOW BATTERY” message. If it still shows a low battery message, try pressing the System Status button and Disarm button. Repeat if necessary. If the message still shows, it may take 24 to 48-hours for the battery to fully charge. If after 48-hours the message still shows, please call (800) ADT-ASAP to troubleshoot your system.
When the message is gone or you’re waiting for the battery to charge, remove your system from Test Mode at MyADT.com
Ensure your system is working properly by testing your system. Go to MyADT.com and place your system on test and then follow the directions in the user guide to test your system or visit MyADT.com to find your user guide