

Door and Window Sensor Battery Replacement
Wireless door and window sensors will require battery replacement periodically throughout their lifetime. A door or window sensor low battery condition may be indicated by a trouble indication and/or beeps from your system keypad.
Changing the battery in your door or window sensor is quick and easy. If you have your replacement battery ready to go, you can follow these step-by-step instructions.
If you are not sure which battery you need, visit our sensor battery replacement page to find out.
Step-by-Step Instructions
To replace your door or window sensor battery:
- Locate the zone where the door or window low battery signal is coming from. Most systems will display a low battery trouble condition and a zone number on the keypad. For information on your particular system, please visit our system manuals page.
- Put your system in test mode. This may result in a brief siren and beeping from your keypad in 30 second intervals.
- Open the sensor cover to reveal the battery.
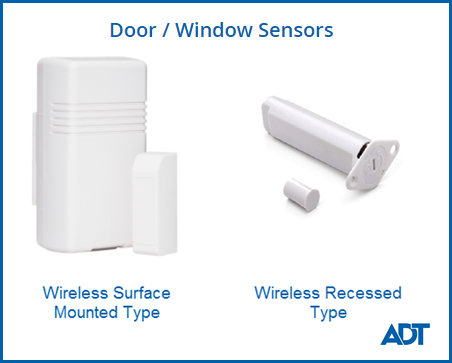
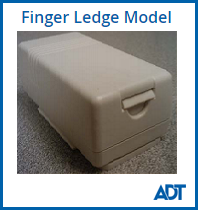
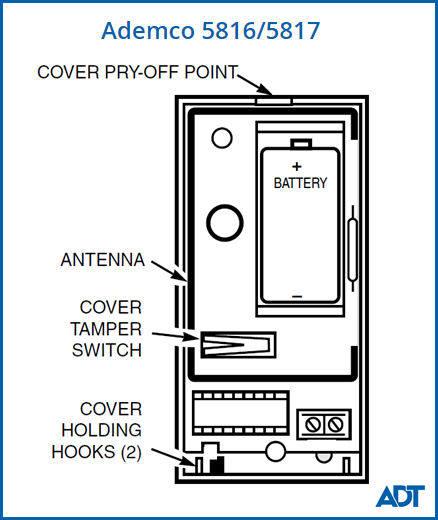
- Surface Mounted: Remove the sensor cover from the transmitter, which is the large half of the door or window contact using the finger ledge on one of the short ends. Some models may have a notch on the short end of the cover that you can insert a flathead screwdriver into and twist to remove the cover. The pictures below are for the Ademco model 5816/5817 series. Your device may vary.

- Recessed Sensor: Remove the end cap by inserting a coin or small flat head screwdriver into the cap's slot and turning counter-clockwise. Slide the transmitter board assembly out of the case taking care not to bend the antenna. The battery is found on the backside of the board. The picture below is for the Ademco model 5818. Your sensor may vary.

- Surface Mounted: Remove the sensor cover from the transmitter, which is the large half of the door or window contact using the finger ledge on one of the short ends. Some models may have a notch on the short end of the cover that you can insert a flathead screwdriver into and twist to remove the cover. The pictures below are for the Ademco model 5816/5817 series. Your device may vary.
- Remove the old battery. You may need to use the flathead screwdriver to gently lift the battery from the device.
- Once the old battery has been out of the device for 30 seconds, install the new battery, paying close attention to the [+] and [-] signs to ensure proper installation. Be careful not to bend the antenna that runs around the outer edge of the device.
- Replace the cover of the device.
- Surface Mounted: Line up the hooks on the short end of the device with the base and then snap the cover closed.
- Recessed Sensor: Gently insert the transmitter board assembly back into the housing battery end first, taking care not to bend the antenna. Replace the end cap by lining up the projections on the cap with the openings at the edge of the case, pressing the cap gently against the transmitter board and turning the cap (via its slot) slightly clockwise, thus locking it in place.
- Check that the sensor and contact are working properly by opening and then closing the secured door or window. You can verify on your keypad that the zone shows “Ready” when the door or window is closed and “Not Ready” when open, or use the Chime feature.
- Reset your keypad. Refer to your system manual, or the System Identification page for instructions.
- Remove your system from test mode.
- Recycle the old battery. To find a recycler, visit Call2Recycle.org. Returning a battery to a recycler on this site is free of charge and will ensure that the battery is recycled according to regulatory requirements..
Related Topics
Finding the Right Sensor Battery
Here you can locate the correct size and type of battery for your sensor
Testing Your System
Here are instructions for placing your system in Test mode, and for removing it from Test mode once the test is complete.
Door and Window Sensor Troubleshooting
Here you will find information on how to troubleshoot problems with your door and window sensors.
Sensor Manuals
Here you will find the manuals for several door and window sensor models