

Battery Replacement Instructions for the ADT Command 2x16 Panel
You may purchase a new system battery on MyADT.com or call 1-800-ADT-ASAP.
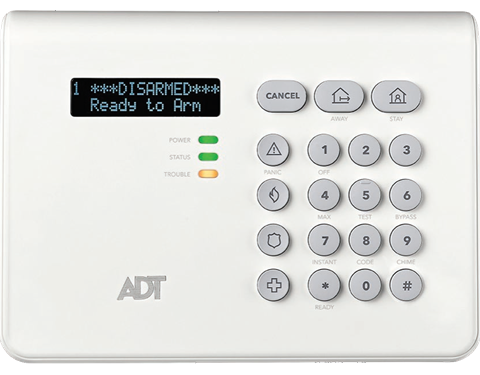
Command All-in-One 2x16 Panel
Battery Safety Instructions
Read these battery safety and replacement instructions in their entirety before handling or using a rechargeable battery.
- Caution: Because of the potential energy stored in a battery, improperly handling or not observing the precautions listed in this document can result in injury from electrolyte leakage, heat generation or explosion.
- Use electrically insulated tools to prevent a short circuit or electrical shock. You can insulate metallic tools using vinyl or electrician’s tape.
- Gently handle the battery when unpacking it. Rough handling can shock the battery pack and cause damage·
- Check that the old battery pack is free from cracks, fractures, corrosion or leakage.
- Be extremely careful not to drop the battery pack to avoid the possibility of damage and/or serious injury.
Instructions
What You'll Need
- A registered MyADT Account
- Small pliers with electrically insulated handles
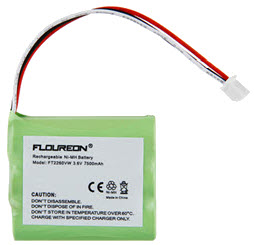
- 3.6v/4.2v, 7500mAh battery
To maintain your system's warranty, this battery must be purchased on MyADT.com or by calling 1-800-ADT-ASAP.
NOTE:
The battery pack is located inside the touchscreen. The battery pack has black and red wires coming out of it with a modular connector at the end.
CAUTION:
Do not remove the green plastic cover from around the new battery pack. This is covering is necessary for a proper connection and may cause serious injury or damage if removed or damaged.
Step 1:
Set your system to Test Mode. Log into your MyADT account, click on the Alarm System tab, and select System Test.
Step 2:
Remove the small Phillips screw from the bottom center of the touchscreen.
Step 3:
Carefully slide the touchscreen up and remove it from the backplate. Use the plastic hanger on the back to clip it onto the backplate hook. Be careful not to pull the wires connected to the back of the touchscreen.
IMPORTANT:
Use the plastic hanger to clip it on the backplate. This supports the touchscreen without causing stress on the wires.
Step 4:
To clear the tamper and beeping on the touchscreen, tap on Base Cover Tamper, and then enter your User Code.
Step 5:
Quickly inspect the old battery. If the battery looks abnormal (i.e. has a swollen or split case, liquid leaking from the case, or corroded terminals) close the touchscreen and call (800) ADT-ASAP to schedule a service call.
Step 6:
Disconnect the battery wires by pulling on the plastic connector.
Step 7:
Remove the battery retaining bar by pulling it to the right and out from the slot. Then use the finger indent next to the battery to pry it out of the battery cable. Gently pull the battery out.
CAUTION:
Do not remove the green plastic cover from around the new battery pack. This covering is necessary for a proper connection and may cause serious injury or damage if removed or damaged.
Step 8:
Connect the new battery wire connector to the touchscreen, and then slide the new battery into the top of the cradle and gently push the bottom into place. Both battery clips will lock onto the battery.
Step 9:
Place the bottom of the battery retainer into its slot and then gently press the top into place until you hear a snap. The battery retainer will be flush with the back of the touchscreen.
Step 10:
Use a Philips screwdriver to secure the battery retainer screw.
Step 11:
Slide the touchscreen onto the backplate by aligning the side tabs into the backplate slots. Push the touchscreen downward until it aligns with the bottom and sides of the backplate.
Step 12:
Screw in the small Phillips screw on the bottom center of the touchscreen.
Step 13:
To clear the tamper, tap on Base Cover Tamper, and then enter user code. Do this twice.
Step 14:
Check your touchscreen to ensure it no longer displays the “Low Batt 802 Keypad” message. If the message still shows, it may take 24 to 48-hours for the battery to fully charge. If after 48-hours the message still shows, please call (800) ADT-ASAP to troubleshoot your system.
When the message is gone or you’re waiting for the battery to charge, remove your system from Test Mode at MyADT.com.
Ensure your system is working properly by testing your system. Go to MyADT.com and place your system on test and then follow the directions in the user guide to test your system or visit MyADT.com to find your user guide.
Disposing of your old battery
ADT is committed to environmental protection and sustainability We strongly encourage you to recycle your old battery as this battery cannot be disposed of with regular household waste.
Please visit www.call2recycle.org and in the "Find a recycling location" field, enter your ZIP Code to find your nearest battery recycling facility.