

QuickConnect Plus - System Manual
System Overview
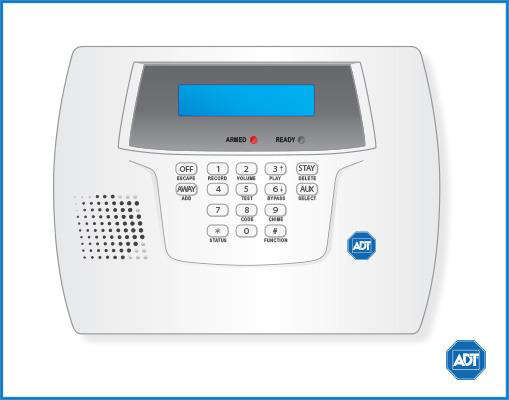
The Safewatch QuickConnect Plus represents the latest in home and business security protection technology providing ADT customers with:
- Burglary, emergency, and fire* protection
- At least one touchpad to control operations and display system status
- Sensors for perimeter and interior burglary protection
- Smoke or combustion detectors* for early fire warning
- Display of zones triggered during alarm
- Two-way voice communication
The Safewatch QuickConnect Plus is designed to be as maintenance free as possible, however we suggest that you still test your system once a month and after any alarm occurrences.
Treat the system as you would any other electrical equipment; do not slam protected doors or windows, keep dust from accumulating on the touchpad and sensors, and do not spray water or any liquid on the units.
System Keywords
| Keyword | Meaning |
| Alarm | Appears when an intrusion has been detected and the system is armed (also appears during a fire alarm or audible emergency alarm). Accompanied by the protection zone in alarm. |
| Away | All burglary zones, interior and perimeter, are armed. |
| Instant | Entry delay is turned off. |
| Stay | Perimeter burglary zones, such as protected windows and doors, are armed. |
| Fire | Appears when a fire alarm or fire fault is present. Accompanied by a display of the zone in alarm. |
| Low BAT | Low battery condition in a wireless sensor (if zone number is displayed or low system battery (if no zone number is displayed). If 00 is displayed, a wireless keypad (5827/5827BD) has a low battery condition. |
| AC | Appears when AC power is present. If not lit, the system is operating on backup battery power. |
| Chime | Appears when the Chime feature is activated. |
| Test | Appears when the system is in Test mode. |
| Rec | Appears when in Recording mode |
| Message | Appears when a message has been recorded and has not yet been played back. |
| Bypass | One or more burglary protection zones have been bypassed. |
| Fault | Appears when a malfunction is discovered in the system at any time, if any open is detected in a fire zone at any time, or when a fault in a day/night burglary zone is discovered during a disarmed period. Accompanied by a display of the zone number in trouble. |
| PH | Appears in place of the clock when the speaker phone mode is active. |
| PC | Appears during a remote phone control session. |
Arm & Disarm the System
Arming
Before arming your system, all protected doors, windows, and other protection zones must be closed or bypassed. Pressing the [STATUS] key will announce all zones that are faulted, as well as any other abnormal system condition, making it easier for you to secure any open zones.
The green Ready indicator on the keypad will be lit if the system is ready to be armed. If blinking, the system is not ready.
System Can Be Armed
The Ready light will be lit when all protection zones have been either closed or bypassed. You may now arm the system as usual.
Arming in Stay Mode
To arm in stay mode:
- Enter your [security code] and press [STAY].
- The keypad will beep three times and display the armed Stay message. The red Armed indicator will light and the system will announce “armed Stay-exit now.”
Arming in Away Mode
To arm in Away mode:
- Enter your [security code] and press [AWAY].
- The keypad will beep twice, or continuously if the exit warning has been programmed for your system, and will display the armed Away message. The red Armed indicator will light and the system will announce “armed Away-exit now.”
Disarming
To disarm the system and silence the burglary alarm:
- Enter [security code] and press the [OFF] button.
- The Ready light will light if no alarms have occurred while armed and the keypad will beep once to confirm that the system is disarmed.
Exit/Entry Delay
Your Safewatch QuickConnect Plus provides a delay after entering or exiting your home before the system is alarmed.
Bypassing Protection Zones
Zones (also called partitions) are areas that can be bypassed when arming the system. This could be ideal for those who want to arm all but one door/window.
Bypassing Protection Zones
Bypassing zones allows you to arm your system with one or more zones intentionally unprotected. The system must be disarmed before arming. Fire zones cannot be bypassed.
To bypass a zone:
- Enter your [security code] + [BYPASS] and enter the 2 digit zone number. Important: All single-digit numbers must be preceded by a zero (for example, enter [02] for zone 2).
- The keypad will display the word “Bypass” along with each bypassed zone number. Wait for these zones to be displayed, to be sure that the intended zones are bypassed.
- Arm the system as usual when the keypad displays the Ready LED on steady.
Displaying Bypassed Zones
The system allows you to determine what zones have been previously bypassed. Bypassed zones can be displayed only when the system is disarmed, and when the "BYPASS" message described above is displayed.
To display bypassed zones:
- Enter your [security code], press [BYPASS] and press [WAIT].
- In a few moments, all open zones will be sequentially displayed along with the word "BYPASS."
Door Chime (Entry/Exit Beeps)
To turn the door chime function on or off, press [FUNCTION] and [CHIME].
Panic Alarms
Emergency Keys
Your system may have been programmed to use special keys to manually activate emergency (panic) functions. To activate a panic function, press and hold down the designated lettered key for at least 2 seconds or press both keys of the designated key pair at the same time.
| Function | Signal to Customer Care | Sound Activated |
| Silent Alarm | Silent alarm | No audible alarm to indicate silent alarm has been activated but a message has been sent to Customer Care |
| Audible Alarm | Audible alarm | A loud, steady alarm on touchpad and any sounders |
| Personal Alarm | Emergency alarm | Steady alarm at touchpad |
| Fire Alarm | Fire alarm | Pulsing sound at external bells and sirens |
Trouble Conditions
Trouble conditions are indicated by the word CHECK and continual beeping from the touchpad. Any key will silence the beeping. A display of CHECK + zone no. may indicate that a problem requires your attention. Check the specified zone area, close any open doors or windows and enter your security code and press [OFF]. If your system includes wireless sensors, the CHECK condition may be caused by some change in the environment of the protected area.
To silence trouble beeps, press any key or enter your security code and press [OFF].
For a complete list of Trouble Conditions, please refer to the Ademco Lynx & QuickConnect Troubleshooting page.
User Access Codes
Access Code Programming
Your system allows for up to 6 user codes for use by other users. However only the master user of the system is the only one who can assign codes to secondary users. For some systems, the master user is designated user no. 02 while in this case, user no. 01 is the installer’s code.
Babysitter Code (User 07): This code can be used to arm the system, but cannot disarm the system unless the system was armed with this code. This code is typically assigned to someone (such as a babysitter) who needs to arm/disarm the system only at certain times. The Babysitter Code is assigned to User 07.
Duress Code (User 08): This feature is intended for use when you are forced to disarm or arm the system under threat. When used, the system will act normally, but can silently notify the alarm monitoring company of your situation. If that service has been provided, The Duress Code is assigned to User 08.
The Duress Code is useful only when the system is connected to an alarm monitoring company.
To Add/Delete a User or Change a User's Code
To add a user code:
- Enter the [Master code] and press the [CODE] key.
- Enter the user number and the user’s code (03-08).
To delete a user code:
- Enter the [Master code] and press the [CODE] key.
- Enter the user’s code (03-08).
- Wait 3 seconds until the keypad beeps once before pressing any other key. The code will automatically be deleted.
System Testing
Testing Your System
Testing allows for each protection point to be checked for proper operation. While the touchpad will beep every 45 seconds during Test Mode, no alarm messages will be sent to the Customer Care Center. We recommend testing the system once a week.
To Test the System:
- Disarm the system.
- Close all protected windows, doors, etc.
- The “Ready” message should be displayed and the green Ready indicator (if present on the keypad) should also be lit.
- Enter your [user code] and then press [TEST].
- The external sounder should sound for 2 seconds and then turn off.
FAULT ZONES. Open each protected door and window in turn and listen for three beeps from the keypad. Identification of each faulted protection point should appear on the display. The display will clear when the door or window is closed.
Walk in front of any interior motion detectors (if used) and listen for three beeps. The identification of the detector should appear on the display when it is activated, and its voice descriptor will be announced (if programmed). The display will clear when no motion is detected. Note that if wireless motion detectors are used, there is a 3-minute delay between activations. This is to conserve battery life.
To test all smoke detectors, follow the manufacturer's instructions. The identification of each detector should appear on the display when each is activated.
If a problem is experienced with any protection point (no confirming sounds, no display), notify your service company.
When all protection points have been checked and are intact (closed), there should be no zone identification numbers displayed on the keypad
Exit Test Mode
When testing is completed, exit the Test Mode by entering your [security code] and pressing the [OFF] key.
If the Test Mode is inadvertently left active, it will automatically turn off after 4 hours.
To learn more about testing your system, please visit System Testing.
Other System Information
For a more detailed description of these features, please refer to the manufacturer’s complete manual.
Time & Date Programming
Your system can display the current time. The date is not displayed, but has an internal function. The system must be disarmed with no faults present.
To set the time and date, enter the [Master code] + [FUNCTION] and enter [63].
NOTES:
1. The keypad beeps twice for invalid data entries (e.g., an hour greater than 12), and the entry will not be accepted. The keypad beeps once for valid entries.
2. Clock-Setting mode automatically ends if no keys are pressed for one minute.
3. Daylight savings time may have been programmed to automatically begin and end.
1. The system will announce, "Enter two-digit hour then press [ADD] to accept, [ESCAPE] to quit."
Hour (The current hour will be displayed with the AM/PM indication.)
Enter the 2-digit hour (i.e., 01-12).
Press [ADD] to accept the entry and continue to the AM/PM selection.
Press [ESCAPE] to exit Clock/Calendar mode (keypad beeps 4 times).
2. The system will announce, "Enter one for PM, zero for AM, press [ADD] to accept, [ESCAPE] to quit."
AM/PM (The current AM/PM setting will display A or P.)
Enter [1] for PM or [0] for AM.
Press [ADD] to accept the entry and continue to the minute selection.
Press [ESCAPE] to return to hour selection.
3. The system will announce, "Enter two-digit minute press [ADD] to accept, [ESCAPE] to quit."
Minute (The current minute will display.)
Enter the 2-digit minute (i.e., 00-59).
Press [ADD] to accept the entry and continue to the month selection.
Press [ESCAPE] to return to the AM/PM setting.
4. The system will announce, "Enter two-digit month press [ADD] to accept, [ESCAPE] to quit."
Month (The current month will display.)
Enter the 2-digit month designation (i.e., 01-12).
Press [ADD] to accept the entry and continue to the day selection.
Press [ESCAPE] to return to the minute setting.
5. The system will announce, "Enter two-digit day press [ADD] to accept, [ESCAPE] to quit."
Day (The current day of the month will display.)
Enter the 2-digit day of the month (i.e., 01-31).
Press [ACCEPT] to accept the entry and continue to the year setting.
Press [ESCAPE] to return to the month setting.
6. The system will announce, "Enter two-digit year press [ADD] to accept, [ESCAPE] to quit."
Year (The current year will display.)
Enter the last two digits of the year (i.e., 00-99).
Press [ADD] to accept the entry and exit Clock-Setting mode (keypad beeps 4 times).
Press [ESCAPE] to return to the day setting.
Message Recording/Playback/Volume Control
The ADT Safewatch QuickConnect Security System Message Center allows you to record, play and delete messages. The maximum message duration is 85 seconds.
NOTES: (1) The Record/playback functions can only be performed from the master keypad. It cannot be performed from any other wireless keypad.
(2) If the system loses electrical power, all messages will be erased.
(3) Message Play/Record will not be available if a report must be sent.
(4) Individual messages cannot be played back or deleted.
Recording a Message
To record a message:
- Press [FUNCTION] + [RECORD].
- The keypad displays "REC MESSAGE." Begin speaking into the microphone.
- The recording will automatically stop after 85 seconds, if a message has been recorded. The keypad will beep twice and "REC" will no longer be displayed. "MESSAGE" will still be displayed.
- To stop recording before the end of 85 seconds, press [OFF].
- The keypad beeps twice, the REC display turns off, but the MESSAGE display remains on.
- Additional messages can be recorded, as long as there is recording time remaining, by repeating the above steps.
NOTE: If you are trying to record a new message and the message center is already full, the system will announce "END MESSAGE" and "REC MESSAGE" will not be displayed. If the message center is full all old messages must be deleted before new messages can be recorded. See Deleting Messages section.
Message Playback
The lighted word MESSAGE indicates that a new message is in memory. After playing the message, the MESSAGE display turns off.
To play a message, press [FUNCTION] + [PLAY].
All recorded messages will be announced sequentially. A short beep will sound between messages.
To skip a message, press [*].
NOTE: If a wireless keypad has been installed and is programmed for quick arming, it cannot be used to activate message playback or adjust the volume. In this case, you must use the master keypad to perform these functions.
Deleting Messages
To delete all messages:
- Press [FUNCTION] + [PLAY].
- While the messages are being announced, press [FUNCTION] + [DELETE].
- A double beep will sound confirming that the messages have been deleted.
Adjusting the Volume
The volume level of message playback, system announcements, and status beeps can be changed. You can also mute system announcements, if desired.
To adjust message playback/system announcement volume:
- Press [FUNCTION] + [VOLUME] + [3] to increase or [6] to decrease volume level.
- Repeat the key sequence until the desired volume level is achieved.
To mute system announcements:
- Press [FUNCTION] + [VOLUME] + [OFF].
- The volume level will be restored to the level that was selected prior to muting the sound.
AUX Function
The [AUX] key may have been programmed to perform a predefined function. If programmed for the AUX function, you can use the [AUX] key to activate a string of up to 20 keystrokes that been stored in the system's memory. Typical functions include:
- Seldom used but repeatable sequences.
- Arming sequences that involve bypassing zones before arming.
Defining the AUX Function
To define the Aux Function:
- Disarm the system.
- Enter [user code] +[FUNCTION] + [AUX] (hold down at least 2 seconds until 4 beeps sound).
- Press the desired command sequence, up to 20 keystrokes. Press the [AUX] key between each command in the sequence.
- Press the [AUX] key twice to end the definition.
For example, to bypass Zones 10 and 11 and arm AWAY, enter the following string: [user code] + [FUNCTION] + [AUX] + [6] + [10] + [11] + [AUX] + [AWAY] + [0] + [AUX] Note that the [AUX] key is included in the 20 keystroke maximum.
Performing the AUX Function
To perform the Aux Function:
- Press and hold the [AUX] key. Hold down at least 2 seconds until 4 beeps sound.
- Enter the [user code].
Remote Phone Control Feature
The ADT Safewatch QuickConnect Security System is equipped with a remote interactive phone capability that permits access to the security system from any off-site touch tone telephone using all user codes. If this feature has been programmed, the system will provide the appropriate voice messages and any system beeping sounds indicating the status of the security system over the phone line. (Refer to Summary of Audible Notifications for further information.) The following functions can be performed from any remote touch-tone telephone:
- Disarm the system
- Arm the system in STAY or AWAY mode
- Bypass zones
- Check system status
The remote access session will be aborted if:
- A report must be sent
- Any local or wireless key entry, except [*], is made
- User Code is not entered within eight (8) seconds of call pickup (during the "system...system announcement)
- No keys are depressed for a period of 15 seconds and while no announcement has been made by the system. Any remote key entry will, however, extend this timeout back to 15 seconds
It will not be possible to begin a remote access session if:
- A report must be sent
- The system is in any Test mode
- During real time clock setting
- Panel is in shutdown mode (programmed by your installer)
- Panel is in Macro learning mode
- Remote phone control feature has not been enabled by your installer
NOTE: If a remote phone session is not granted by the system, for any of the reasons identified above, a modem tone will be generated before the end of the session.
Using the Remote Phone Control Feature
To use the Remote Phone Control Feature:
- Dial the control's phone number. If no answering machine is present, the control will pick up between 1 and 14 rings, depending on the number programmed by your installer and will periodically announce "SYSTEM ENTER CODE."
- During a remote phone control session "PC" will be displayed on the control.
- Enter your [user code]. The system status will be announced.
- Enter your [user code] once again.
- Upon entering remote phone control mode, the ADT Safewatch QuickConnect Security System will announce "System, enter code."
- To remotely disarm the system, enter your [user code] + [1].
- To remotely arm in AWAY mode, enter your [user code] + [2].
- To remotely arm in STAY mode, enter your [user code] + [3].
- To remotely Bypass zones, enter your [user code] + [6] + zone no.
- To remotely activate Forced Bypass, enter your [user code] + [6] + [#].
- To remotely check system status, press [*].
Single Button Arming and Step Arming
Single Button Arming
Single Button Arming, which allows for activating your alarm by pressing a single function key only, is available on most security systems. You are not required to enter your user code upon arming, however the system will require your code to disarm. In order to activate your single button arming, press and hold the designated function key for two seconds until the armed indicator is displayed. Please see the manufacturer’s manual for a detailed explanation of this feature.
Single Button “Step” Arming
Single Button “Step” Arming, is similar to Single Button Arming. However, the designated function key can arm the system in any of three modes: Stay, Night-Stay, and Armed-Away.
Quick Bypass
Your system may allow you to easily bypass all open (faulted) zones without having to enter zone numbers individually.
To bypass a zone:
- Enter your [security code], press [BYPASS] and press [WAIT].
- In a few moments, all open zones will be displayed along with the word “BYPASS.” Wait for these zones to be displayed before arming. Arming the system before zones are displayed eliminates all bypasses.
- Arm the system as usual when the keypad displays the READY LED on steady.