

Simon XT System Manual
System Overview
Overview
Your security system is made up of a control panel, one or more keypads and various sensors and detectors. The control panel will be mounted out of the way in a utility closet or in a basement.
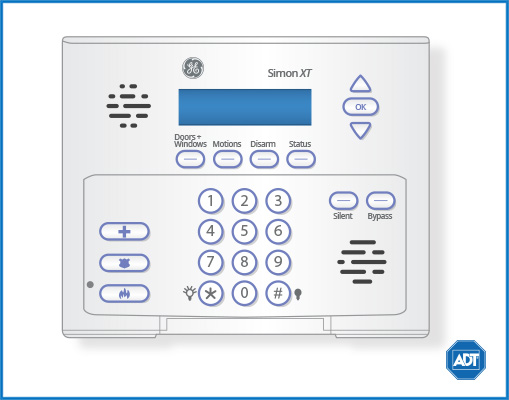
All the keypads have an audible indicator and command entry keys. The LED keypads have a group of zone and system status lights. The LCD keypad has an alphanumeric liquid crystal display (LCD). The keypad is used to send commands to the system and to display the current system status. The keypad(s) will be mounted in a convenient location inside the protected premises close to the entry/exit door(s).
The security system has several zones of area protection and each of these zones will be connected to one or more sensors (motion detectors, glassbreak detectors, door contacts, etc.). A sensor in alarm will be indicated by the corresponding zone lights flashing on a LED keypad or by written messages on the LCD keypad.
General System Overview
The Simon XT represents the latest in home and business security protection technology providing ADT customers with:
- Burglary, emergency, and fire* protection
- At least one touchpad to control operations and display system status
- Sensors for perimeter and interior burglary protection
- Smoke or combustion detectors* for early fire warning
- Display of zones triggered during alarm
- Displayed and spoken messages
- Multiple partition arming/disarming
- System scheduling
- Remote control
The Simon XT is designed to be as maintenance free as possible, however we suggest that you still test your system once a month and after any alarm occurrences.
Treat the system as you would any other electrical equipment; do not slam protected doors or windows, keep dust from accumulating on the touchpad and sensors, and do not spray water or any liquid on the units.
*Your system may or may not be set up for fire protection.
Arm & Disarm the System
Arming
Arming Doors and Windows
To arm doors and windows:
- Ensure all doors and windows are closed.
- Press [DOORS] + [WINDOWS] + [security code] when the panel displays “enter code”.
- The panel will display “Doors + Windows”, the [door] + [window] button will light up, and the system will speak “Door and windows on”.
- The panel will begin an ‘exit delay’ and will sound the exit beep until the exit delay expires.
Arming Doors, Windows and Motion Sensors
To arm doors, windows and motion sensors:
- Press [DOORS] + [WINDOWS] + [security code] when the panel displays “enter code”.
- While the panel is in the process of arming, press [MOTIONS].
- The panel displays “Doors + Windows & Motions”, the [DOOR] + [WINDOW] and [MOTION] button will light up, and the system will speak “Doors and windows on, motions on”.
- The panel will begin an "exit delay" and beep until the exit delay expires.
Disarming
To disarm:
- Press [DISARM], then enter your [code] when the panel displays ‘enter code”.
- The panel displays DISARM, pees once and speaks “disarmed”
Subdisarm
To subdisarm:
- Enter the [master code] while the system is disarmed.
- The panel will display “Subdisarmed”, the DISARM button will blink, and the system will speak “subdisarmed” and beep once.
EXIT/ENTRY DELAY
Your Simon XT provides a delay after entering or exiting your home before the system is alarmed.
Exit Delay
The exit delay is the amount of time the system gives you to exit the home before the system is armed. When the user arms the system, an exit delay starts. During the delay the user can vacate the premises through a delayed response door without causing an alarm.
Silent Exit
The silent exit feature silences the beeps accompanying the exit delay. Press SILENT after you arm the system to silence the beeps. NOTE: enabling the silent exit doubles the exit delay time.
Entry Delay
The entry delay is the amount of time a system gives you to disarm the system before sound the alarm. This feature must be programmed by the installer. Some active sensors cause immediate alarms when tripped. Other sensors, if enrolled in a delayed response group, start an entry delay that lets you enter the premises and disarm the system. If the system has not been disarmed by the end of the entry delay, the alarm occurs.
No Delay
This feature must be programmed by the installer. IF the system was armed with the No Delay feature activated, there will be no entry delay and the alarm will occur immediately.
Protest During Arming
The system may protest an arming level change if certain abnormal conditions exist. If a sensor that is active in the requested arming level is open, the system sounds protest beeps and automatically bypasses the open sensor (depending on system configurations).
Quick Exit
Allows for a quick exit when one wants to briefly leave the premises (i.e., grab the newspaper) without sounding the alarm. This feature must be programmed by the installer.
Bypassing Sensors
Bypassing a sensor allows you to open a protected door/sensor when the system is armed. For example, if you would like for your doors and windows to be armed, but would like the option of opening up a kitchen window without triggering the alarm, you can bypass that window only.
To bypass sensors:
- Press [BYPASS] and enter the [master code].
- Scroll up/down to find the desired sensor (e.g., Sn 1 Front Door).
- Press [ENTER] to bypass the sensor.
- When the sensor is bypassed, the panel will display “bypassed” on the second line.
To unbypass:
- Press [BYPASS] and enter the [master code].
- Scroll up/down and find the desired sensor to be unbypassed.
- Press [ENTER] to unbypass (inactivate bypass) the sensor.
- The panel will remove the word “bypassed” from the second line of the display.
Chimes
This feature allows you to be notified when anyone enters or exits your home by signaling a chime when a protected area/sensor is opened while the system is disarmed. A solid bell icon will appear in the display when Chime is enabled.
To enable or disable the chime feature:
- Scroll up/down until the display shows “Chime.”
- Press [ENTER], the current setting will flash.
- Scroll up/down to choose Chime On/Off.
- Press [ENTER] at the desired setting.
- Press [STATUS] to exit the menu.
Door Chime (Entry/Exit Beeps)
To turn the door chime function on or off, press and hold the [CHIME] key for 2 seconds or press [*][4].
Panic Alarms
Emergency Keys
Your system provides a series of alarms that indicate an usual occurrence. When an alarm is active, the panel displays ALARM ALARM ALARM PRESS STATUS.
Alarms are canceled by entering the valid master user code. This will disarm the system.
Police
Press and hold the [POLICE] button for two seconds (or press twice quickly) to call the ADT Monitoring Centers and notify them of a nonmedical call for help.
Emergency
Press and hold the [EMERGENCY] button for two seconds (or press twice quickly) to call the ADT Monitoring Centers and notify them of a nonmedical call for help.
Fire
Press and hold the [FIRE] button for two seconds (or press twice quickly) to call the ADT Monitoring Centers and notify them of a nonmedical call for help.
Duress
Please refer to the Duress Code section below.
Piezo Beeps
Your panel has two built in sound sources; a piezo siren and a speaker. The piezo siren makes alarm beeps and status beeps. Fire and intrusion alarm beeps are always played at a high volume, while status beeps (i.e., chimes, exit beeps, etc.) have adjustable volume.
This option determines whether or not the panel sounds alarm beeps.
To program piezo beeps:
- Enter the SYSTEM PROGRAMMING menu.
- Scroll up/down to SIREN OPTIONS, then press [ENTER].
- Scroll up/down to PANEL PIEZO ALRM, then press [ENTER].
- The current value of this option now flashes on/off.
- Scroll up/down to the desired value, then press [ENTER].
- Press [STATUS] repeatedly to exit.
Trouble Conditions
Your security system is able to automatically test itself for power failures, low batteries, nonworking sensors, and communication troubles with the ADT Monitoring Centers. When your security system detects a trouble condition, six rapid beeps will sound every minute for four hours until the trouble condition is corrected.
To silence trouble beeps, press [STATUS] or arm/disarm the system.
For a complete list of Trouble Conditions, please refer to the Simon XT Troubleshooting page.
User Access Codes
Access Code Programming
Your Simon XT allows you to program certain options, such as individual access codes, panel alert beeps, timers, light control, system test, etc.
Programming user access codes uses the same program format as any other programming feature. For all programming, enter the system menu by pressing [ENTER]. Scroll up and down until the desired menu is displayed and press [ENTER]. Reach submenus by pressing [ENTER] again. You can exit a menu by pressing [STATUS]. The panel will automatically exit you from the system menu after a period of inactivity.
Authority Levels
The Simon XT provides a system of codes to be entered when a certain level of authority is required to perform an action. These codes allow you to activate system options, customize panel operations, and generate a silent alarm. Note: any combination of 40 or more key presses (such as fourteen invalid three-digit codes) will cause a system access alarm. The alarm will lock all touchpads for 90 seconds.
| Code |
Description |
| Master code | The master code is the main code used for panel operations. The default code will be 123, 1234, 12345, or 123456. |
| User codes 1 through 8 | These eight codes are supplemental user codes. These codes can be used for panel operations such as disarming, but not programming. These codes can be any 3, 4, 5, or 6-digit code, depending on the code length. |
| Duress code | The duress code is used to generate a silent duress alarm while disarming. |
To set/change user access codes:
- Enter the System Programming menu.
- Scroll up/down to Access Codes, then press [ENTER].
- Scroll up/down to Master Code, then press [ENTER].
- The current value of the code now flashes. Enter the new code, then press [ENTER].
Press [STATUS] repeatedly to exit.
System Testing
Sensors
You can test your sensors one at a time to make sure they are sending strong signals to the panel. You should test your system often.
To perform a sensor test:
- Scroll to System Tests
- Press [ENTER]. Enter the [master code].
- Press [Enter]. The panel will display “Sensor Test”.
- Press [Enter]. The display will show a list of sensors to be tested. For example, “Trip Sn 1 Front Door”. The panel will sound six beeps once a minute while in Sensor Test mode.
- Tripping a sensor will display which sensor has been tripped. For example, “Sn 1 Packets = 8 Front Door”. Sensors will be removed off the list after testing.
- When all sensors have been tested, the display shows Sn Test Complete, Press [STATUS].
- Press [STATUS] to exit.
How to Trip a Sensor
| Device | To Trip Device |
| Door/window sensor | Open the secured door or window. |
| Freeze sensor | Apply ice to the sensor. Do not allow the sensor to get wet. |
| Water sensor | Press a wet rag or wet finger over both of the round, gold-plated terminals on the underside of the sensor. |
| Carbon monoxide sensor |
Unplug the CO alarm. Plug it back in and press the [TEST/RESET] button until it the unit beeps 8 times. |
| Glass guard sensor |
Tap the glass 3 or 4 inches (6 to 8 cm) from the sensor |
| Motion sensor | Avoid the motion sensor's view for five minutes, then enter its view. |
| Shock sensor | Tap the glass twice, away from the sensor. Wait at least 30 seconds before testing again. |
| Smoke sensor | Press and hold the test button until the system sounds transmission begins. |
| Wireless panic button | Press and hold the appropriate panic button for three seconds. |
| Keyfob | Press and hold [LOCK] and [UNLOCK] simultaneously for three seconds. |
| Remote handheld touchpad | Press and hold the two emergency buttons simultaneously for three seconds. |
Communication
You can test the communication between your system and ADT Monitoring Centers.
To perform a communications test:
- Scroll to Test Systems.
- Press [ENTER]. Enter your [master code].
- Press [ENTER]. Scroll to Comm Test and press [ENTER].
- The display will show that Comm Test is on.
- After a successful test, the display will show “Comm Test Ok”. If there was a failure, your display will show “Comm Test Failure”.
To learn more about testing your system, please visit System Testing.
Other System Information
Common Zone Operation
Your system may have been set up to use a common zone, which is an area shared by users of both partitions, such as a foyer or lobby. If so, please note the following:
- The common zone will sound and report alarms only when both partitions are armed. If only one partition is armed, the system ignores faults on the common zone.
- Either partition may arm its system if the common zone is faulted, but once armed, the other partition will not be able to arm unless the common zone is first bypassed or the fault is corrected.
- Faults on the common zone are displayed on keypads in both partitions.
- Either partition can clear and restore the common zone after an alarm.
Maintaining Your System
Silencing Low Battery Warning Tones at the Keypad
You can silence the keypad’s warning tones by pressing the OFF key, but the keypad's message display will remain on as a reminder that you have a low battery condition in one or more of your sensors. When you replace the weak battery with a fresh one, the sensor will send a signal to the control as soon as the sensor is activated (opening/closing of door, window, etc.), causing the warning to be deactivated. If the sensor is not activated, the display will automatically clear within approximately 1 hour.
Routine Care
- Treat the components of your security system as you would any other electrical equipment. Do not slam sensor-protected doors or windows.
- Keep dust from accumulating on the keypad and all protective sensors, particularly on motion sensors and smoke detectors.
- The keypad and sensors should be cleaned carefully with a dry soft cloth. Do not spray water or any other fluid on the units.