

Viewing from the Dashboard
An image from one of your cameras appears on the Dashboard beneath the Security icon. The name of the camera from which the image originates appears at the bottom of the image. Swipe the screen to the left or right to display pictures from other installed cameras.
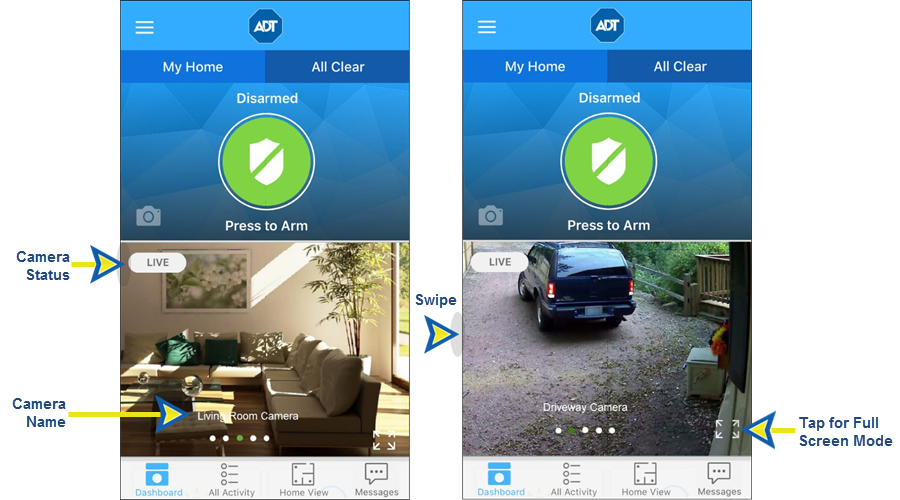
Tap the icon ![]() in the lower right corner to view the image in full screen mode.
in the lower right corner to view the image in full screen mode.
To change the default camera viewed when the Dashboard is accessed, go to Default Camera View under Dashboard and Video Settings on the Settings screen. Please refer to Pulse Mobile App – Settings for details.
Viewing from the Menu
To access your full list of cameras:
- Tap the Navigation Menu ≡ (hamburger) icon
- On the Navigation Menu, tap CAMERAS
- Scroll up and down, if needed, to view images from all cameras
- Tap the thumbnail to view a full-screen image from a specific camera.
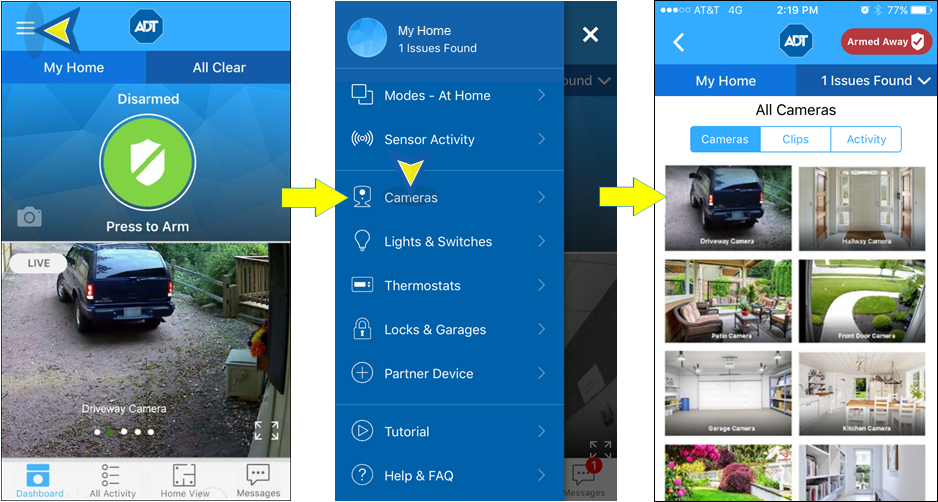
The All Cameras list screen shows a still image from each camera taken at the time the screen is accessed, listed in alphabetical order by camera name. Note: These images are temporary and not stored in the Clips Gallery.
Image Controls
Live Streaming
The LIVE tag appears in the upper right corner when the Dashboard image is streaming live. When not streaming, a snapshot appears in the Dashboard instead, along with the tag NOT LIVE. Typically, live streaming is only used when the device is connected to Wi-Fi. To stream live video over data network (3G/LTE), change the streaming method under Dashboard and Video Settings on the Settings screen. Please refer to Pulse Mobile App – Settings for details
Live Streaming
When viewing an image from the Dashboard, tap the Full Screen ![]() button on the lower right corner of the image to display the video image full screen. When viewing from the All Cameras screen, just tap the image. Please rotate your phone to view the full screen image.
button on the lower right corner of the image to display the video image full screen. When viewing from the All Cameras screen, just tap the image. Please rotate your phone to view the full screen image.
The name of the camera being viewed will appear on the top center of the screen; the image state (Live/Not Live) will appear in the upper left corner. Swipe left or right to scroll through images from other cameras at the site. Tap the image to access the Video menu. This menu will display for several seconds and then disappear if not accessed.
To exit the Full Screen view, in iOS, tap the Collapse ![]() icon in the lower right corner of the menu; in Android, tap the BACK button.
icon in the lower right corner of the menu; in Android, tap the BACK button.
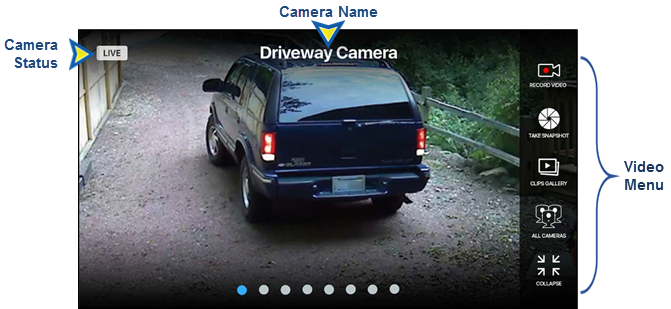
The Video Menu options are:
|
Taking Snapshots and Capturing Video Clips
You can take photos or capture video clips from any camera. To take a photo or capture a video clip: 1. Access the Full Screen mode for the desired camera: a. From the Dashboard, tap the Full Screen button on the lower right corner of the camera image b. From the All Cameras screen, tap the camera image 2. In Full Screen mode, tap the image to display the Video Menu |
|
3. Tap the appropriate icon: a. To record a 30-second Video clip, tap the Record Video icon. A red dot will flash while the video is being recorded. b. To record a snapshot image from the camera, tap the Take Snapshot icon. The image currently displayed on the camera is recorded. |
|
Viewing Photos and Video Clips
Photos and Video clips are access from the Clips Gallery. This Gallery can be access from the Dashboard or from the Navigation Menu.
Locating Snapshots and Videos
From the Dashboard:
- Select the desired camera.
- Tap the Full Screen
 button in the lower right corner of the camera image.
 - Tap the image to reveal the Video Menu.
- Tap CLIPS GALLERY to view the snapshots and video clips from the selected camera, or tap ALL CAMERAS to view snapshots and images from all cameras
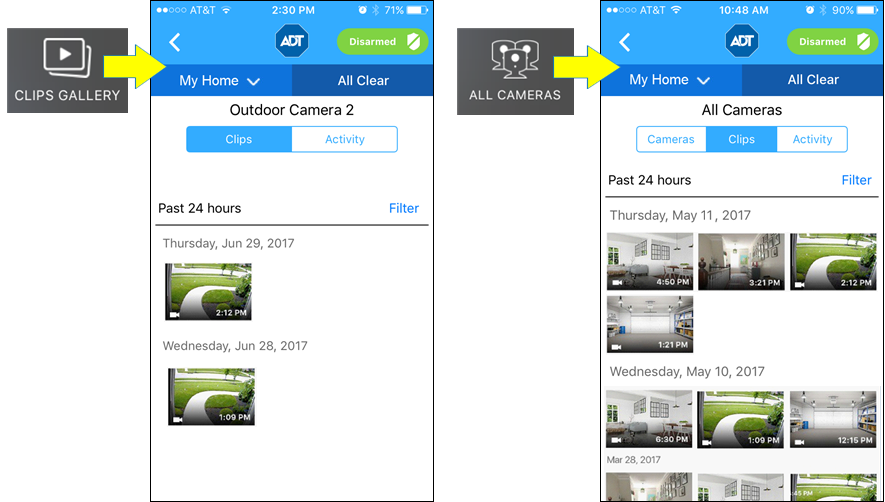
From the Navigation Menu:
- Tap the Navigation Menu ≡ (hamburger) icon
- On the Navigation Menu, tap CAMERAS
- On the All cameras screen, tap CLIPS
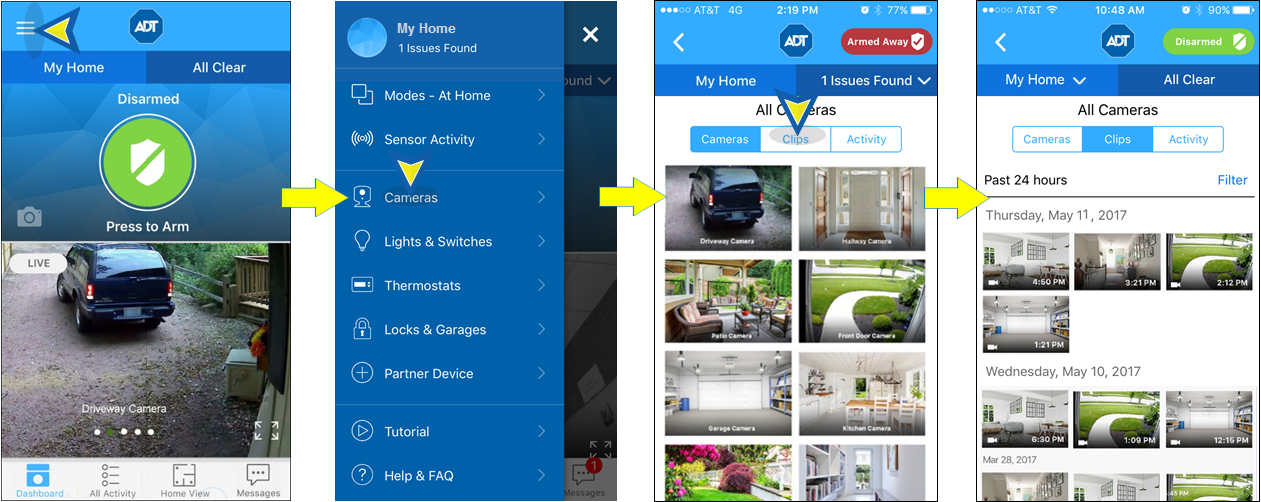
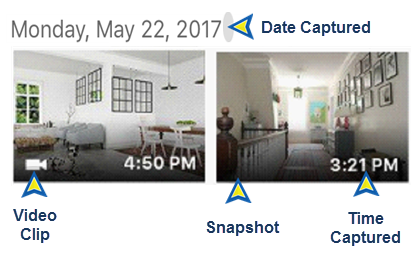
Both the Single Camera and All Cameras Clips Galleries show thumbnails of the most recent photos and video clips from that camera, displayed by the day they were captured, with the most recent first. Scroll down to view more images clips. Each clip is marked with the time it was captured. Video clips show the ![]() icon.
icon.
Viewing Snapshots
Tap the desired photo. This image displays full screen, along with the day and time the photo was taken and an image number indicator.
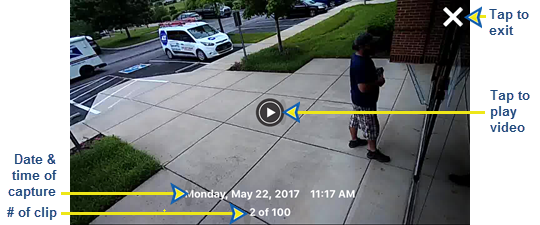
When you finish viewing the photo, tap the “X” in the upper right corner to return to the Clips Gallery.
Viewing Video Clips
Tap the desired video. This image displays full screen, along with the day and time the photo was taken and an image number indicator. The Play Video icon ![]() will appear in the center of the image. Tap to begin playback.
will appear in the center of the image. Tap to begin playback.
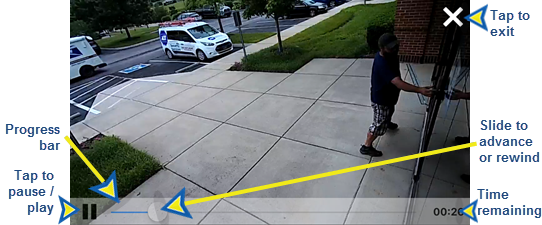
Video controls are displayed at the bottom of the screen. After a few seconds, the overlay disappears, and only the video is displayed. Tap the screen to display the overlay again.
Camera Activity
From both the Single Camera and the All Cameras screens you can view a list of the activities for one or all cameras by tapping ACTIVITY. This displays a time-stamped log of all camera activity that has occurred within the designated time period; the default is the past 24 hours.
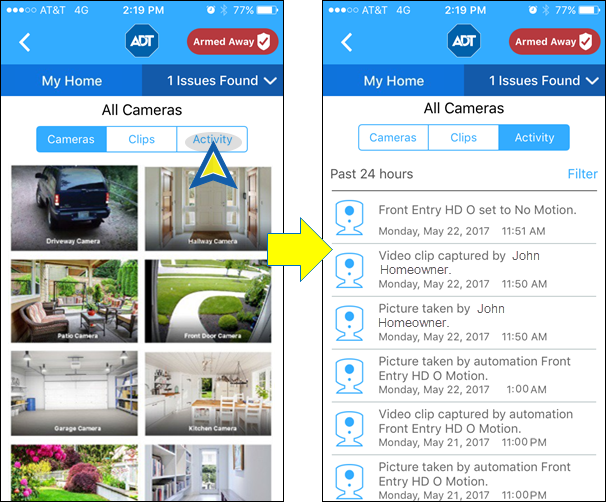
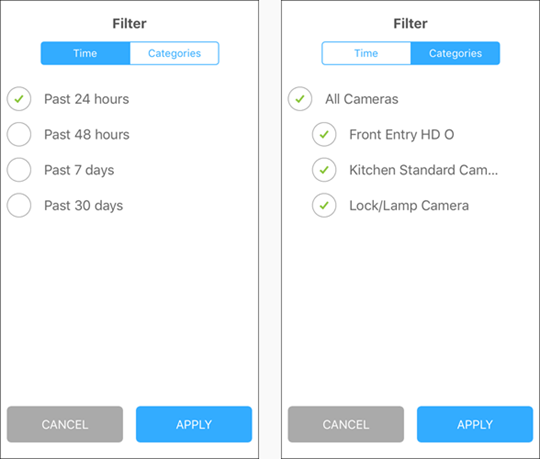
To view activities from other time periods, tap FILTER in the upper right corner. You can filter by time or by specific camera. Tap APPLY to apply the filter; tap CANCEL to return to the All Activities screen.
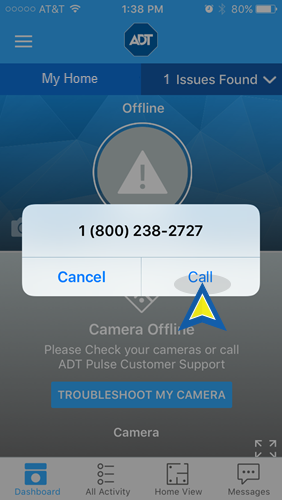
Cameras Offline
When the camera is offline and not available to the system, a Camera Offline message will be displayed.
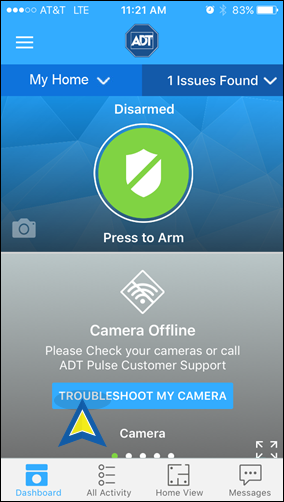
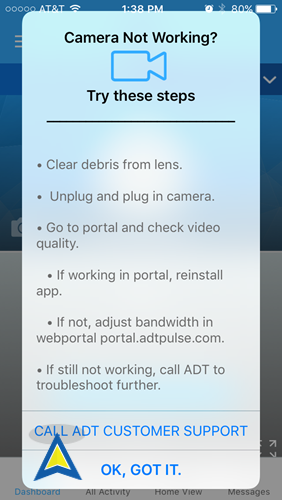
Tap TROUBLESHOOT MY CAMERA for helpful hints for getting your camera back online. If you have questions or need assistance, tap CALL ADT CUSTOMER SUPPORT, then tap CALL to be connected with an ADT Customer Service agent.
For information on troubleshooting your Pulse cameras, please refer to Pulse Camera Offline Troubleshooting.
Related Topics
ADT Pulse Mobile App – Settings
Here you will find information on setting your default camera view on the dashboard and your live streaming option.
Pulse Camera Offline Troubleshooting
Here you will find information on troubleshooting your camera.
Pulse Camera Add-on and Replacement
Here you will find information on adding and replacing a Pulse camera