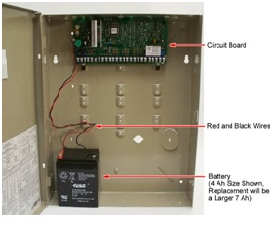
12V System Battery Instructions
This replacement guide applies to the following batteries: 12V 4Ah, 12V 5Ah and 12V 7Ah.
Not sure this battery is the one you need? Check the battery compatibility page to find out which battery your system requires.
You can log-in to purchase this battery on MyADT, or look for it at the following battery retailers: Batteries Plus, Target, Walgreens, Walmart or Amazon.com.
Installing a Replacement Battery
Removing the Old Battery
- Put the system in test mode.
- Locate and open the control panel box and unplug the control panel’s transformer from the electrical outlet. You can open the box by removing the screws on the side and bottom of the cover or with a panel control box key.

- Examine the old battery for any damage, such as swollen or split casing, leaking liquids, heat, corroded terminals, etc. If there is no abnormal damage, proceed to step 4; otherwise please call to schedule service.
- Disconnect the old battery.
- Pull the black wire’s connector from the negative (-) battery terminal. This may require pliers with electrically insulated handles. The connector may need to be wiggled slightly for it to loosen and disconnect.
- Pull the red wire’s connector from the positive (+) battery terminal using the method described above.
- Remove the old battery from the control box panel. Do not touch any metal objects to the terminals on the battery or to the open end of the black and red wire connector.
Installing the New Battery
- Remove any plastic outer wrap from the new battery and, if the battery has plastic terminal protectors, remove them before connecting the wires to the battery.
- Connect the red wire to the red or (+) terminal of the new battery by pushing the the connector firmly.
- Connect the black wire to the black or (-) terminal of the new battery by pushing the connector firmly.
- Plug the transformer into the outlet and if necessary, screw it back into the wall outlet.
- Check for a low battery signal on your system’s touchpad. If the low battery message is still displayed, pressing [*] twice should remove the notice. The new battery may need to charge for a short period of time before activating. If the warning persists 48 hours after the new battery installation, please call Customer Care.
- Once the touchpad no longer displays low batt, test your system once again.
- Secure the control panel box by closing the panel box and replacing screws/locking the door.
- Recycle old battery. To find a recycler, visit Call2Recycle. Returning a lead-acid battery to a recycler on this site is free of charge and will ensure that the battery is recycled according to regulatory requirements.
